Writing Markdown
July 11, 2022
I’ve been writing Markdown for years now. I started writing it when I was working in tech because it was a convenient way to write minimal plain-text I could turn into a pretty report page to make my boss happy (and I could automate it so I didn’t have to keep writing the reports). Along the way though, I really came to appreciate Markdown as a tool in my belt that let me mostly just focus on my writing and leave the ✨ aesthetics ✨ for later (or, often, never).
In fact, nearly the content on this site–the blog posts, the game text, the various landing pages–is written in Markdown. You can actually see the source online, since it’s public. Even this page is Markdown!
I’ve been pushing for a while now to help folks adopt an alternate workflow that I think makes drafting (and maintaining) text easier, but I realized recently that where I am with my workflow is pretty far from where I started, and maybe it would be useful to put together a quick post on my workflow and tools.
I won’t cover the Markdown syntax much here, except by way of example/notes. Instead, I want to help you get setup as quickly and painlessly as I can to give you a headstart–and point you at some more advanced topics you can dive into later.
Writing #
The first point to make is this:
You don’t need any special tools to write or read Markdown.
You can write Markdown in anything–notepad, google docs, ghostwriter, vi–without any special workarounds or tools. Markdown is a markup language. You write (mostly) plain-text, which can be transformed into something else. Usually, it’s transformed into HTML or PDF for online and offline viewing respectively.
Here’s an example using just about all the Markdown you’ll ever need to know:
> ### Example Markdown
>
> The first line of this example is a header. One or more `#` symbols indicates
> a header and the number of them indicates the level, like `<h1>` through
> `<h6>` tags in HTML. The strange `` ` `` symbol in the last sentence (and
> again in this one) is a backtick. When we wrap text in backticks, it renders
> as mono-spaced text, like code.
>
> This entire example is in a quote block, which is why every line starts with a `>`.
>
> In _this_ paragraph, you can see some **emphasized** text. In the previous
> sentence, the word `this` was italicized and `emphasized` was bold.
>
> You can use ordered lists:
>
> 1. First
> 1. Second
> 1. Third
>
> > **NB:** You can use regular numbering, but it works even if you just specify
> > `1.` for each item. I do this because it lets me easily reorder items in a
> > list if/when needed. Also, you can nest elements, like quote block quotes
> > (like this one) and lists--super useful!
>
> You can use unordered lists:
>
> - One
> - Two
> - Three
>
> And there's a couple ways to do links:
>
> - Bare urls, like: https://flagrant.garden
> - [Inline links](https://flagrant.garden)
> - [Reference links][reference-link]
>
> > **NB:** Reference links are a way to shorthand a link so you don't have to
> > type it over and over; they also make it easier to read sentences with
> > links, since you're not dropping a honking huge URL right in the middle of a
> > sentence. You can put their definition anywhere, I usually do it at the end
> > of my files.
>
> [reference-link]: https://flagrant.garden
>
> Last, you can add comments<!-- with don't get rendered -->.
And here it is, rendered:
Example Markdown #
The first line of this example is a header. One or more
#symbols indicates a header and the number of them indicates the level, like<h1>through<h6>tags in HTML. The strange`symbol in the last sentence (and again in this one) is a backtick. When we wrap text in backticks, it renders as mono-spaced text, like code.This entire example is in a quote block, which is why every line starts with a
>.In this paragraph, you can see some emphasized text. In the previous sentence, the word
thiswas italicized andemphasizedwas bold.You can use ordered lists:
- First
- Second
- Third
NB: You can use regular numbering, but it works even if you just specify
1.for each item. I do this because it lets me easily reorder items in a list if/when needed. Also, you can nest elements, like quote block quotes (like this one) and lists–super useful!You can use unordered lists:
- One
- Two
- Three
And there’s a couple ways to do links:
- Bare urls, like: https://flagrant.garden
- Inline links
- Reference links
NB: Reference links are a way to shorthand a link so you don’t have to type it over and over; they also make it easier to read sentences with links, since you’re not dropping a honking huge URL right in the middle of a sentence. You can put their definition anywhere, I usually do it at the end of my files.
Last, you can add comments.
Okay, so that’s Markdown, great. But what if you do want to get a little more out of it than just writing it in plaintext? What if you could get some visible cues as to how your Markdown is going?
This is where a text editor can help. I use VS Code both out of habit and because the ecosystem is extremely robust, with lots of extensions and helpers to make my life a lot easier. VS Code is free, open source, and gets monthly updates. New features constantly smooth out my workflow.
VS Code #
The first thing to do is install it. The link in the prior sentence will take you to the instructions, which are better than anything I could write here (especially since whatever I write here can become outdated), but it is… just software. Download it, install it, and that’s it!
Aside: Chocolatey
I won’t go into detail in this post, but for those of you using Windows, there’s a neat tool called Chocolatey which makes installing and updating software way easier. For example, you could install VS Code like this:
choco install vscode -yI strongly recommend it, if only to make your life a little easier on Windows.
Once you have VS Code installed, you may be pleasantly surprised to learn that it’s already setup for writing Markdown. For the rest of this post, I’m going to assume you’re using VS Code - though much of what I’m doing with it can be done with any similarly modern editor software.
Open a new file and copy the example text from the code block above. You’ll get highlighting automatically. On my computer, that looks like this:
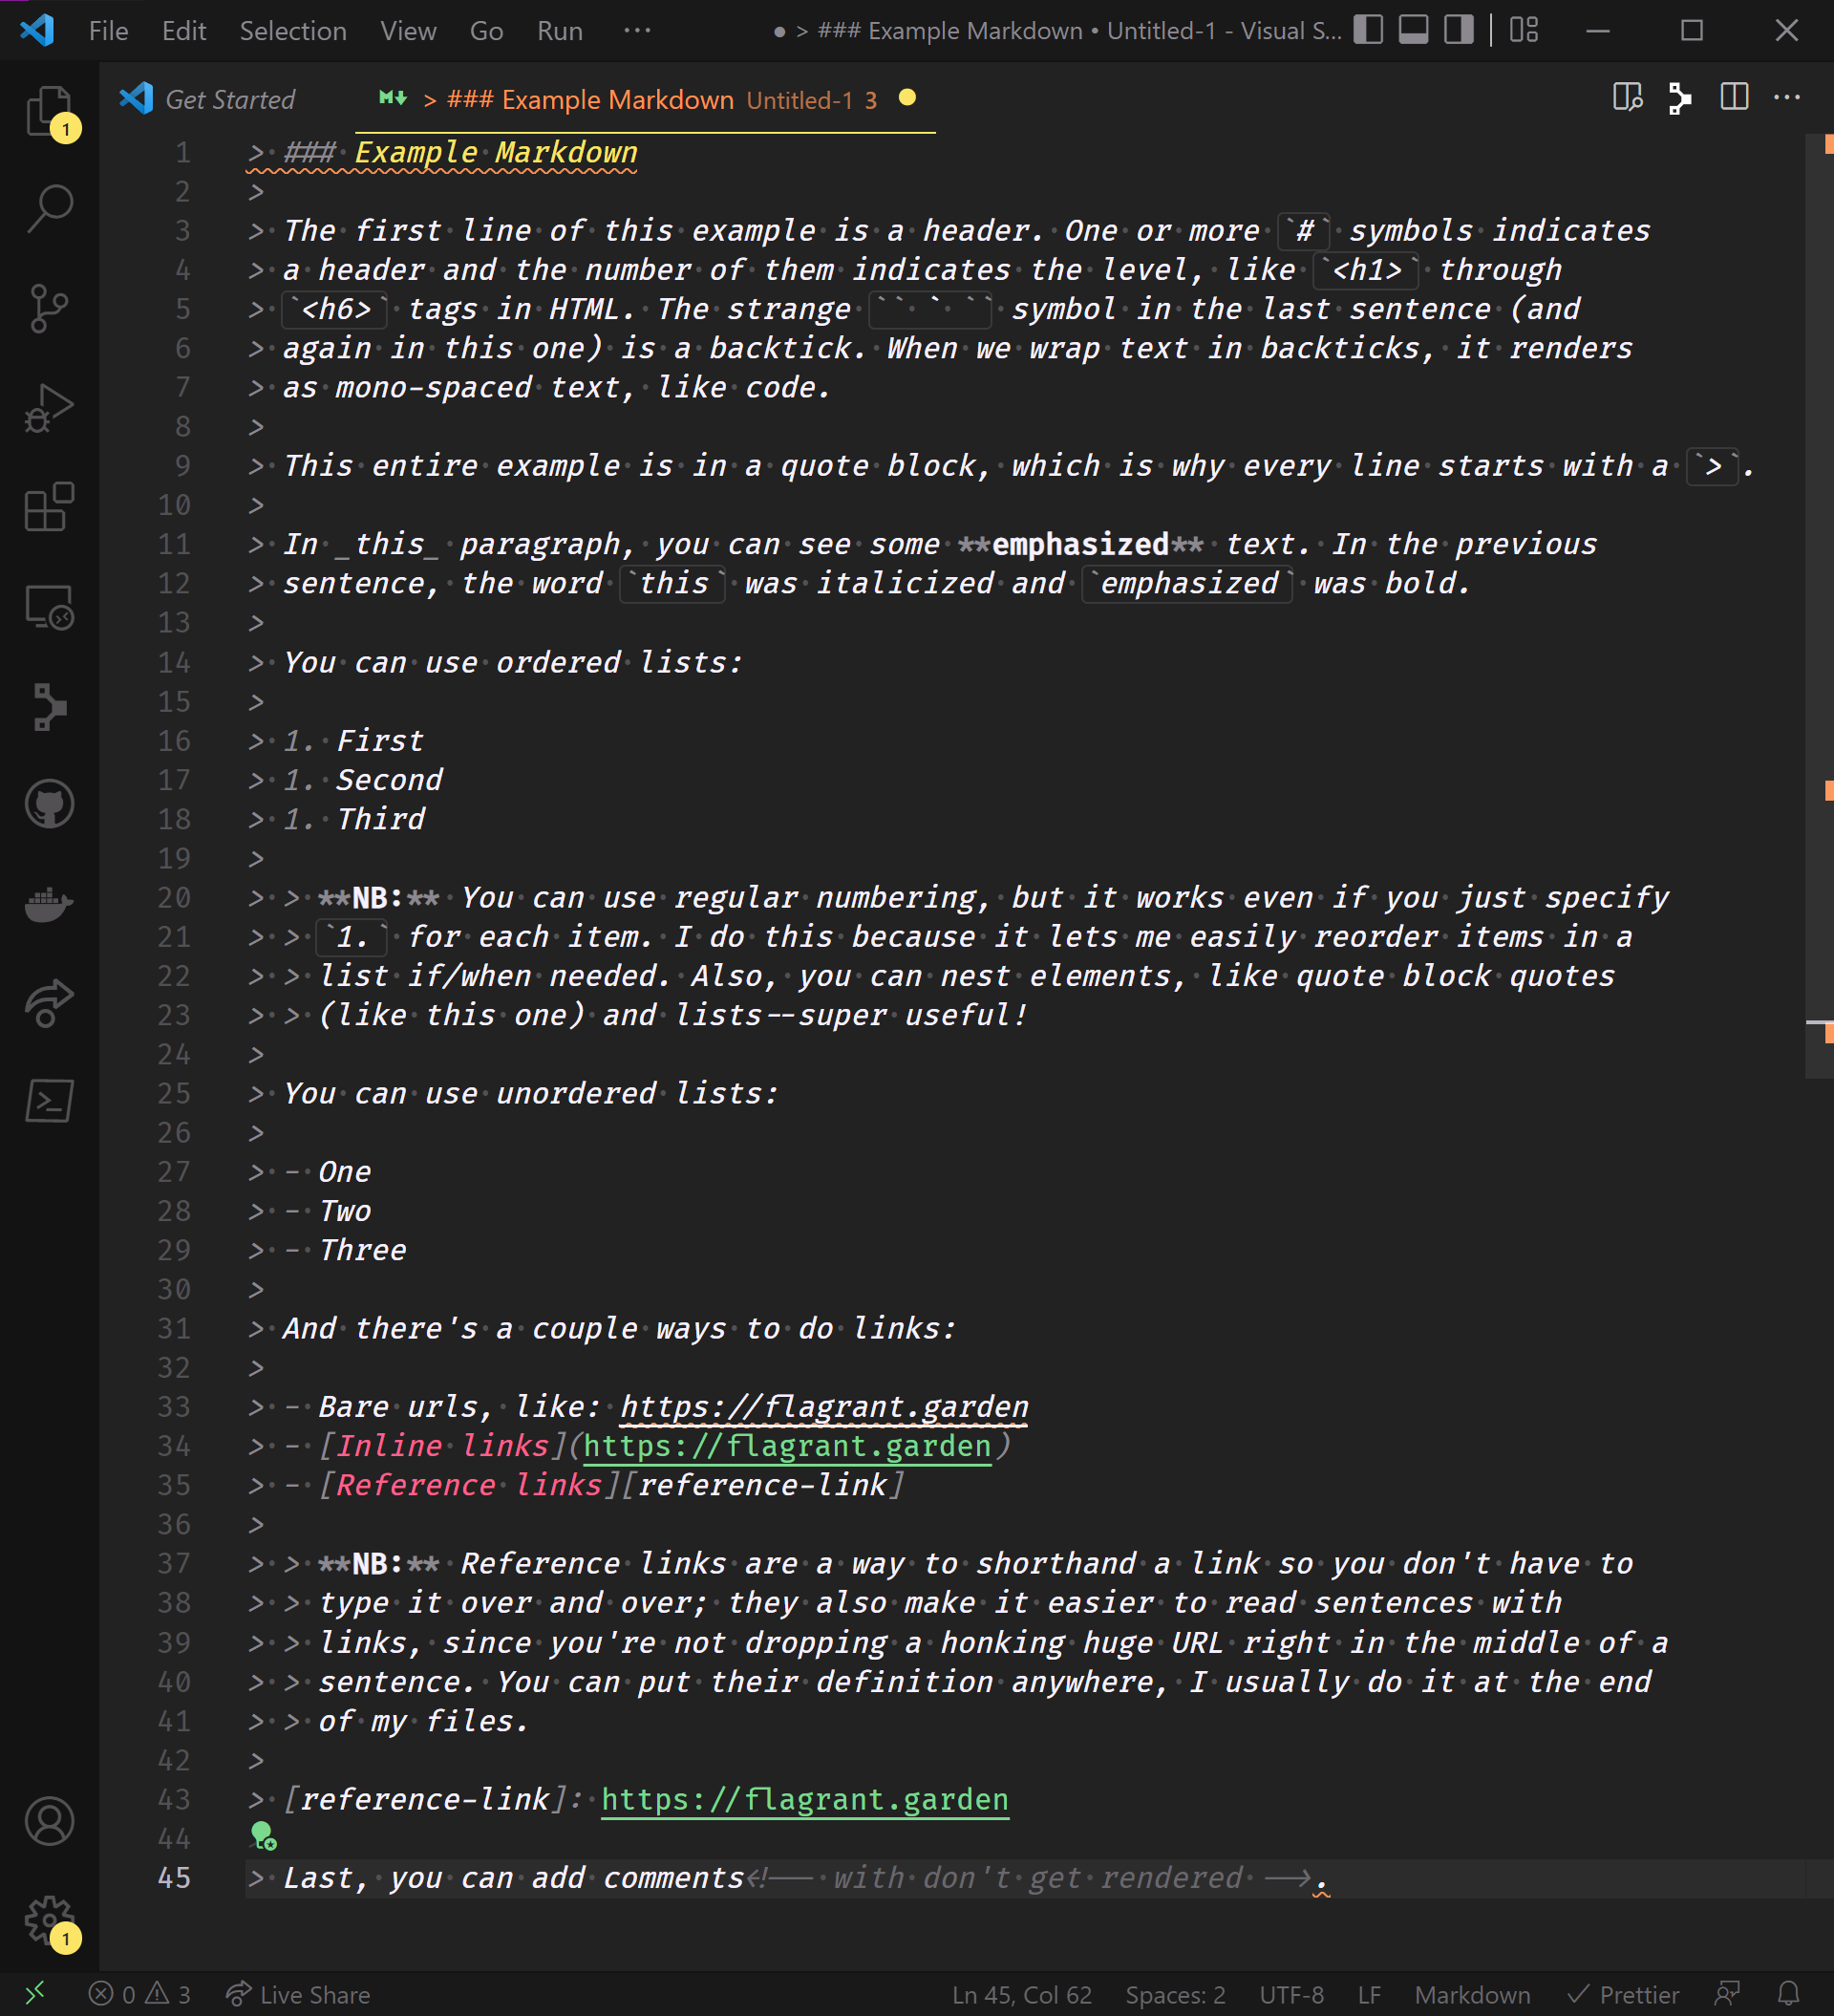
Now that you have some Markdown text open, you can see a preview of it. This lets you view your Markdown with the rendered version of it side-by-side to see how things are going.
You can also see the outline view for your document, which shows you all the sections and headers–I use this to navigate around all the time.
There’s a lot of basic editing features built into VS Code, but my favorites are definitely multi-cursor editing, IntelliSense, find and replace, and auto formatting.
Multi-Cursor Editing
I can’t go back to not having multiple cursors. This lets you edit several lines or words at once. I use this when I want to change some wording, turn a list into a table, and a lot more. It doesn’t sound wild, but once you get used to having them, they’re very hard to give up.
IntelliSense
If you press Ctrl + Space while typing a Markdown document, you’ll also see a list of options pop up - these are snippets, and they’re shortcuts for writing. They’ll help you insert the right things until you learn the syntax better.
Find and Replace
This is a sort of super-charged version of the Ctrl + F and Ctrl + H experience for finding and replacing text you might be used to.
If you use either hot key with a word selected, that word becomes the search text. If you highlight a section, you can search just in that section. You can search with and without case-sensitivity and, if you’re a nerd, you can use regular expressions too (both to find text and for replacing it, too).
It can find and replace multiple lines and you can use the same functionality across files. Updated some terminology in your draft? You can use the folder-level find-and-replace to update it everywhere.
Auto Formatting
The editor has some very good support for automatic formatting–for modifying your Markdown text based on some configurable rules. You may not care too much about this right now, but it will make maintaining and reviewing your work later much easier.
You can set it to format when you save a file (my recommendation), when you type, and when you paste text in. We’ll dig into this a bit more in the Linting section.
You can also use familiar keyboard shortcuts for Windows, MacOS, and Linux.
Extensions for Writing #
Everything so far is just “in the box” with VS Code. But there’s a couple of options, called extensions, which start to making using a modern editor much, much better than pretty much any other option.
You can install extensions in several ways, but the easiest in my experience is to use the Extensions view in the Activity Bar on the side of the editor to search for and install them. Once they’re installed, they update automatically.
Markdown All in One #
The Markdown All in One extension adds an enormous amount of quality of life improvements for Markdown authors.
It adds several keybindings, including for toggling whether text is:
- bold (Ctrl/Cmd + B)
- italic (Ctrl/Cmd + I)
Struckthrough(Alt + S–Windows only)
It adds a command for automatically creating or updating the table of contents for a file, makes editing lists even easier, helps you auto format tables (Alt + Shift + F on Windows, Ctrl + Shift + I on Linux), auto completion for links, and a ton more.
I use most of the features for this extension daily without realizing it because they just work and make the editing experience that much smoother.
change-case #
The change-case extension is one I never think about needing until I really need it. It’s a small extension with one purpose: to reliably set the casing of some text.
Mostly, when writing documents, it’s useful for these two options:
- Sentence: Converts the first letter of the first word to upper case, the remainder to lower, with spaces between.
- Title: Converts the first letter of every word to upper case, the remainder to lower, with spaces between.
We can see what this looks like with some examples:
Upper: THIS IS THE EXAMPLE STRING
Sentence: This is the example string
Title: This Is The Example String
It’s not perfect, but it’s quick and functional.
Reflow Markdown #
The Reflow Markdown extension is one I only started using recently and now I use it all the time. In short, it lets you set a maximum line length and use the Alt + Q hotkey to automatically turn a long line into shorter lines, aware of their leading markup.
This is an extension you probably won’t care too much about if you’re never going to track your work beyond chucking it in a cloud drive or on a thumbstick, but if you end up using source control (in my opinion, you should), it becomes indispensable.
It also makes things easier to read since your lines don’t wander forever, but you can also solve that problem with the Alt/Cmd + Z hotkey for toggling word wrapping (i.e. should your text scroll off the visible part of the editor or wrap at the edge).
Linting #
Linting is a way to automatically check your work for common mistakes and problems. For writing Markdown, there’s really two distinct types of linting that are useful to us: linting the markup–i.e. did you use Markdown’s syntax correctly–and linting the text–i.e. did you write good.
Luckily, both types of linting are well-supported in VS Code (and for Markdown generally).
markdownlint #
While markdownlint is technically available separately from VS Code, in my experience it’s a hassle to use that way. I just install the extension per their docs and go from there.
What this gives you is a long list of rules describing best practices for writing Markdown that’s easier for you to read and maintain. Above all, it helps you write your Markdown consistently, so you can be sure that the syntax you used two weeks ago means what you think it means.
This shows up in a few ways:
When you’re typing, it will add some colored squiggles beneath any rule violations (by default, orange for a warning and red for an error). If you hover over those squiggles, it tells you what’s wrong. For example:

More than this, a lot of the problems can be automatically fixed (you can click on the “Quick Fix” or use the hot key it specifies).
VS Code also has a UI called the Problems Pane (you can get to it from the little ⚠ symbol in the bottom left or by pressing Ctrl + Shift + M) which shows you every discovered violation in your file(s). You can click any listed warning or error to go straight to the problem in your file.
There’s one more way, but we’ll cover that when we talk about ErrorLens.
The markdownlint extension can automatically fix errors for you when you save, but it requires
tweaking your settings. Instead, you can use the Command Palette (via the
Ctrl/Cmd + Shift + P hotkey) and type markdownlint to
see the available commands:
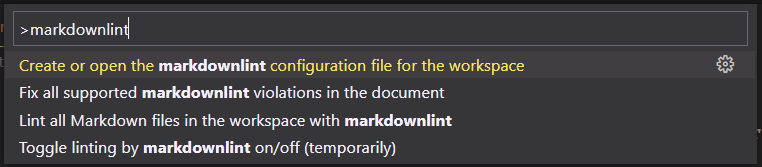
- Create or open the markdownlint configuration file for the workspace (more on this soon)
- Fix all supported markdownlint violations in the document
- Lint all Markdown files in the workspace with markdownlint
- Toggle linting by markdownlint on/off (temporarily)
The configuration of markdownlint can be confusing if you’re not already used to working with code configuration files. For now, I suggest you leave it with the defaults. You can checkout the default rules to familiarize yourself, but you’ll see the warnings pop up once you have the extension installed and get to know them pretty quickly (or not, if you’re magic and make no mistakes, unlike me).
Vale #
Vale and its VS Code extension, unlike markdownlint, are for checking your writing rather than your Markdown syntax. Also unlike markdownlint, you need to install Vale separately, though the install is fairly minimal and well documented.
Rather than trying to handcraft your own magical configuration, I recommend you either use the
generator or just copy this one, saving it as .vale.ini in the folder where
you’re writing your Markdown:
StylesPath = .vscode/styles
MinAlertLevel = suggestion
Vocab = Base
Packages = Microsoft, proselint, write-good, alex, Readability
[*]
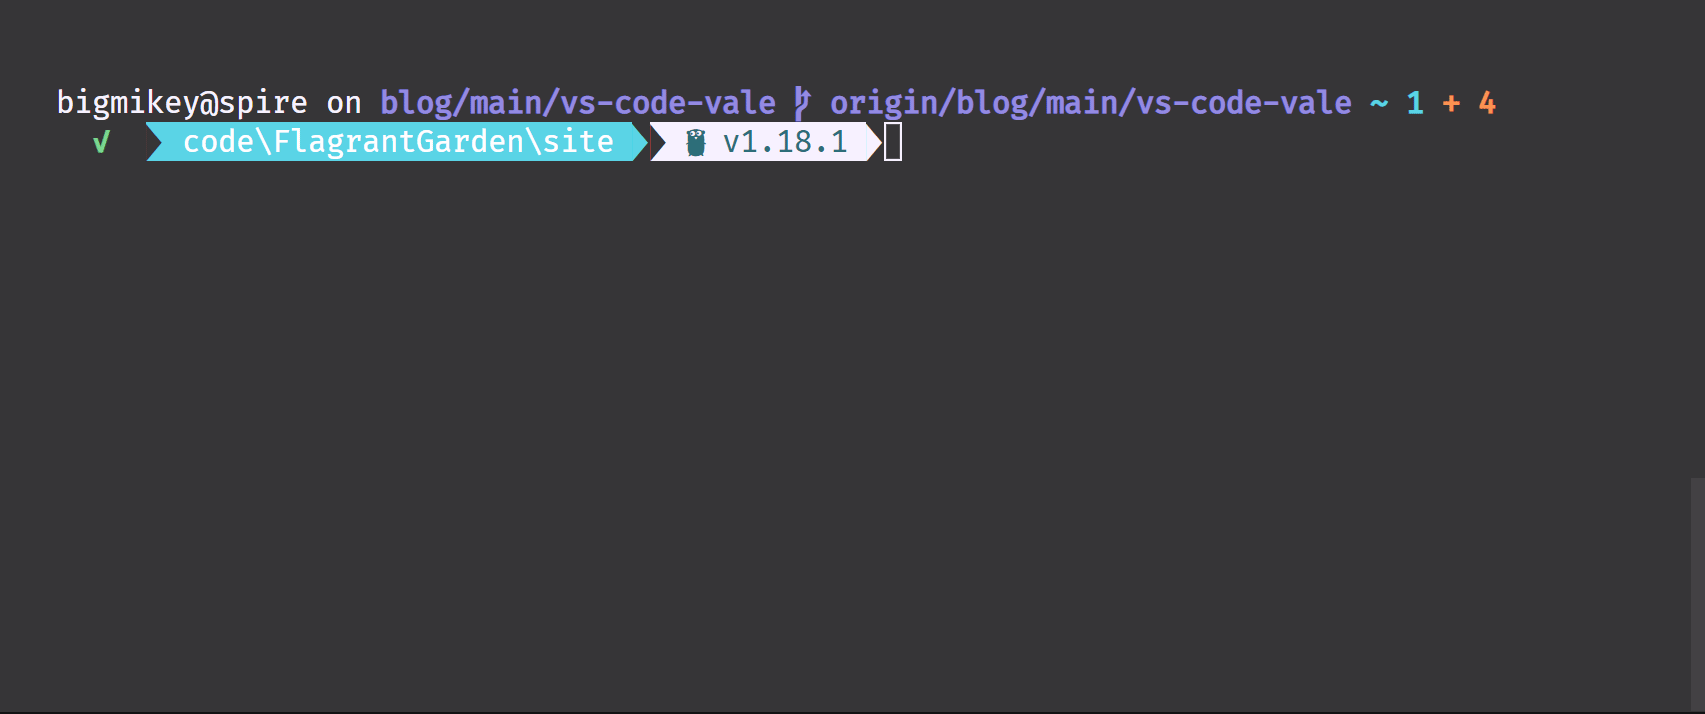
BasedOnStyles = Vale, Microsoft, proselint, write-good, alex, ReadabilityOnce you have a configuration and vale installed, you need to run a command. VS Code has a built-in terminal that you can access with the Ctrl/Cmd + ` hotkey. Pull it up and type this command, then hit enter:
vale syncYou should see output like this (ignore my fancy prompt):
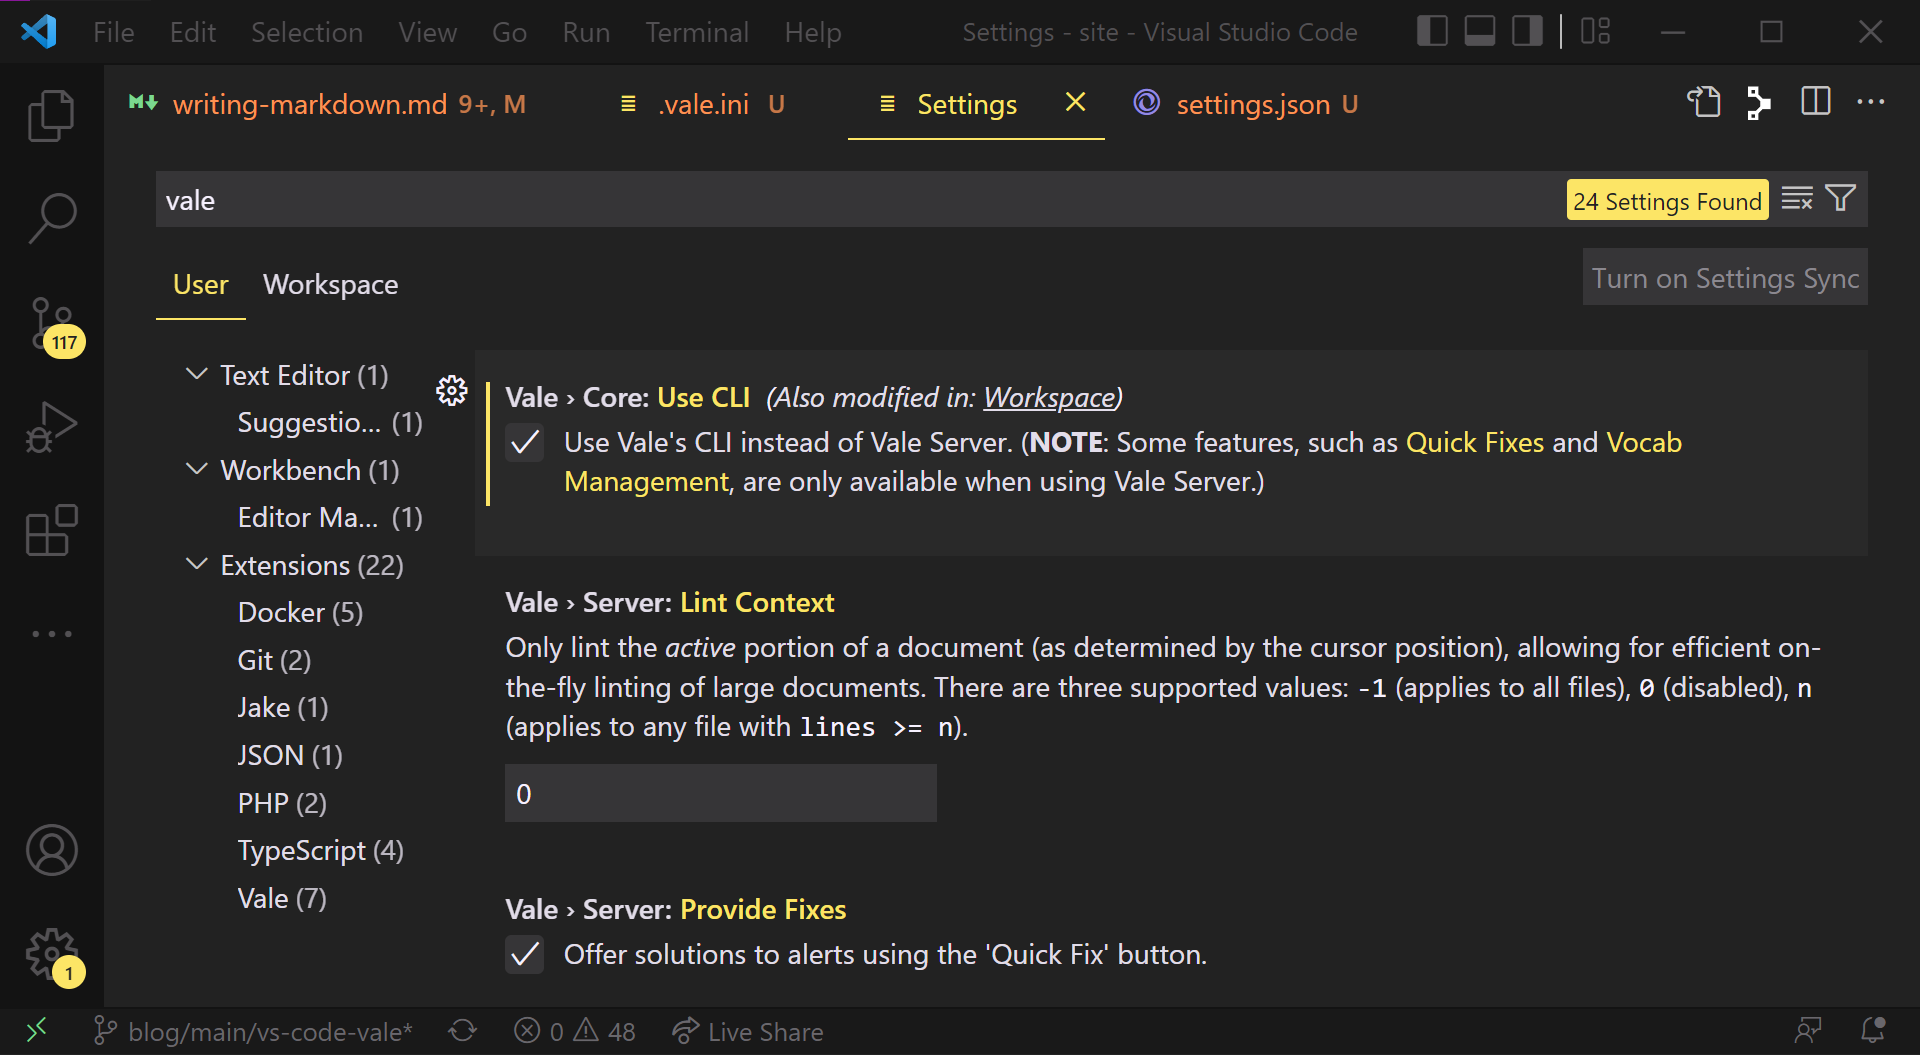
Next, edit your VS Code settings. Use the Ctrl/Cmd + , hotkey to
open your user settings, type vale into the search bar, then check the box for “Vale > Core: Use
CLI.”
Lastly, reload VS Code by opening the Command Palette (Ctrl/Cmd + Shift +
P) and type reload and select the option “Developer: Reload Window.”
When VS Code restarts, Vale is loaded and any rule violations show up in the editor, just like they did with markdownlint.

The rules Vale uses to lint your text can be noisy. I’ll discuss more about configuring Vale–and writing custom rules–in a future post. For now, just know that you can use Vale to check for all sorts of issues in your writing: passive voice, ableist terms, weasel words, correct spelling/capitalization, and so much more.
Where Vale really starts to shine is when you settle into and define house rules for your writing, especially if you do so with your editors. That can help you catch your common mistakes and cut down on how much time your editors need to spend on the tedium of their work–meaning they can spend more time doing the more difficult and higher-value parts of editing or the project can finish more quickly.
In my experience, having well-defined rules also helps me improve as a writer–I’m getting author-time feedback about the mistakes I make, I can correct them swiftly, and (hopefully) make fewer of them over time.
Gremlins #
The Gremlins extension is a very specific linter. It looks in your files for weird characters that can cause you a lot of heartache but are extremely hard to notice on your own: zero-width spaces, non-breaking spaces, “smart” quotes, etc.
Like the other linters, gremlins shows you these problems in the editor and in the problems pane. In my experience, this is another extension you don’t need until you really need it.
Error Lens #
The last linting extension, Error Lens isn’t a linter itself but instead super-charges your linters by being able to show you in-line (without hovering) what problems are showing up in your work.
I find that it’s too noisy to keep on while I’m writing, however (lots of false-positives when you haven’t finished your sentence or thought), so I toggle it off until I’m ready to read my draft.
Luckily, you can toggle it quickly from the Command Palette. Open the Command Palette (Ctrl/Cmd + Shift + P), type “lens toggle,” then select the “Error Lens: Toggle (Enable/Disable) Everything” option.
With Error Lens on, rule violations look like this:

I find this view much easier to look through when I’m reviewing my drafts for any mistakes the linting has caught.
Wrapup #
When I started this post, I intended to also cover tracking, reviewing, and publishing Markdown, but this post is already too long. I’ll end things here for now and pick up those topics soon, especially if there’s any interest in the community.
While none of these tools or processes are necessary (remember, you can write Markdown in anything), I do think they make the workflow much easier in the long run and leave us with more time and energy to do the hard work: getting drafts done.
Until next time!
~ Mikey